[VIDEO] CoGri Middle East – High Tolerance Floor Construction

February 20, 2019

This was a design and build project where CoGri Middle East were appointed directly by the Client as we have previously executed several floor construction projects for the same Client with fantastic results.

You can see us in action in the video below.


Project Details

We constructed a 175mm thick slab with 1 layer of A193 (7mm dia.) mesh.

The contract called for a FM2 compliant floor slab but CoGri Middle East achieved compliance to the more onerous FM1 specification (all as per The Concrete Society’s Technical Report No.34 – 4th Edition).

The project was spread across two buildings totalling 12,500m2 with the average size of each slab just over 1,000m2 each.

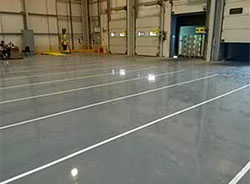
The final power trowel floor finish was achieved to our typical high standard and well cured to give optimum abrasion resistance.

Project Process

  • 10 Seconds: Placing Isedio Armourjoint. Accurately positioned string lines ensure joints are located as per the Face Consultants’ design & specification. After placing of 3m lengths of joint, the joint is attached to the fixing jacks and levelled to Finished Floor Level (FFL).
  • 35 Seconds: Each concrete load is slump tested immediately upon arrival at site. This ensures continuity of concrete quality and the exclusion of any bad/inconsistent loads.
  • 40 Seconds: Concrete is initially discharged to rough levels, then raked out to a more accurate FFL.
  • 1 Minute: Ligchine MAX Pro Laser Screed machine in operation. The accuracy of this machine ensures that the concrete is screeded to FFL and meets the Face Consultants specified flatness.
  • 1 Minute 47 Seconds: Continuous checking of the freshly placed concrete to FFL is a QA procedure employed on all CoGri Middle East projects. Any adjustments are made as/when required.
  • 2 Minutes: Ligchine MAX Pro with operator and man working to accurately rake concrete. Manpower requirement is minimal due to the advanced approach of the Ligchine.
  • 2 Minutes 10 Seconds: Pokering of the concrete around all perimeter edges ensures good compaction of the concrete to eliminate any honeycombing. Particularly important for load transference capacity at dowel interfaces.
  • 2 Minutes 36 Seconds: Power floating process has started with operatives working together to cover all of the surface. Speed & intensity of finishing process varies depending on the stage of curing of concrete. Experience & skill is key here to achieve the desired finish.
  • 2 Minutes 48 Seconds: After finishing process is complete, a curing compound is sprayed on to the surface. This dries into a water barrier type membrane to retain moisture within the slab until the concrete has had a chance to achieve sufficient strength.
  • 3 Minutes 10 Seconds: The following day, the saw cuts (control joints) are introduced. The saw cuts are located exactly as per the Face Consultants’ design. Saw cut locations are based on the proposed racking layout. Cuts are installed to the specified depth and width.

    Saw cuts act as shrinkage and crack management and are essential in the final stages of floor construction to achieve a quality floor slab.

  • 3 Minutes 20 Seconds: Face Consultants performing flatness testing on the previous days’ pour. This instant feedback allows us to continually monitor the finished result and means our work is monitored throughout the floor construction process.

Click here if you want to find out more about our high tolerance floor construction services.

Free Advice

For a site visit or advice on the best solution, contact the experts.

Get In Touch Today

Floor Repair & Refurbishments

Leading international specialists in applied finishes, refurbishment and repair of industrial and commercial concrete floor slabs.

Floor Repair & Refurbishment

Find Out More